

The Complete Step-by-Step Guide: How to Safely Remove Rust from Stainless Steel

Introduction: Why Your Stainless Steel Needs This Guide
Stainless steel is a cornerstone of modern kitchens, architecture, and industry, prized for its sleek look and resistance to tarnish. Yet, discovering an orange-brown blemish of rust on your prized appliance or surface can be baffling and frustrating. The very name “stainless” implies immunity to such corrosion. This guide is designed to demystify this common problem, providing a comprehensive, step-by-step approach to not only remove rust but also understand its causes and prevent its return.
The Misconception of “Stainless” Steel
The term “stainless” steel is more accurately “stain-resistant.” This remarkable metal alloy, which contains a minimum of 10.5% chromium, is not entirely impervious to corrosion. Under specific conditions—involving moisture, chemicals, or contact with other metals—even high-quality stainless steel can develop surface rust. Understanding this vulnerability is the first step toward effective maintenance and cleaning.
What You’ll Learn: A Comprehensive Approach to Rust Removal
This article moves beyond simple cleaning hacks. We will delve into the science of why stainless steel rusts, outline critical safety precautions, and present a tiered system of rust removal techniques. From gentle, natural household remedies for minor surface rust to more robust solutions for stubborn spots, you will learn how to diagnose the severity of the issue and choose the appropriate method, ensuring you restore your metal surfaces without causing damage.
Understanding Rust on Stainless Steel: The Science Behind the Stain
Before tackling the rust, it’s essential to understand the chemistry at play. Knowing why the corrosion occurs empowers you to choose the right cleaning method and implement effective long-term prevention strategies.
What is Rust (Iron Oxide) and Why Does it Form?
Rust is the common term for iron oxide, a reddish-brown compound that forms when iron or its alloys are exposed to oxygen and moisture. This chemical process is known as oxidation. Since stainless steel is an iron-based alloy, it contains the primary ingredient for rust. The key to its resistance lies in its other components.
The Chromium Oxide Layer: Stainless Steel’s Protective Shield
The “stainless” quality of the metal comes from its chromium content. When chromium is exposed to oxygen in the atmosphere, it undergoes a process called passivation, forming a thin, invisible, and incredibly durable layer of chromium oxide on the steel’s surface. This passive layer acts as a protective shield, preventing oxygen and moisture from reaching the iron within the alloy and initiating the oxidation process.
How the Protective Layer Fails: Common Causes of Rust
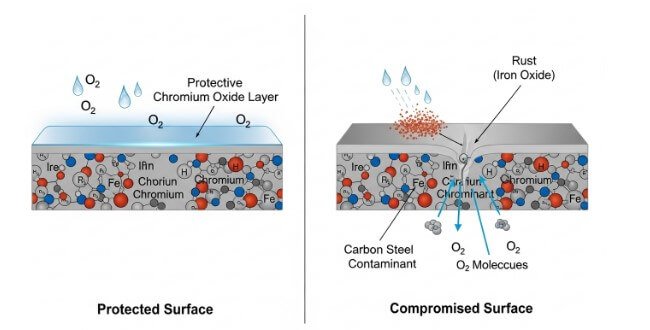
When the protective chromium oxide layer is damaged, moisture and oxygen can reach the iron in the steel, causing rust to form.
Rust appears when this protective chromium oxide layer is compromised, damaged, or removed. Several common factors can lead to this failure:
- Contamination: Contact with regular carbon steel or iron particles (from steel wool, tools, or even water from old iron pipes) can embed into the surface, creating sites for localized corrosion.
- Chlorides: Aggressive chemicals, particularly chlorides found in table salt, seawater, and many household cleaners (like bleach), can break down the passive layer, allowing rust to form. High humidity can accelerate this process.
- Mechanical Damage: Scratches, scuffs, and abrasions can physically remove the protective layer, exposing the underlying iron to the elements.
- Prolonged Exposure to Moisture: Constant contact with water, especially in crevices or areas with poor drainage, prevents the chromium oxide layer from reforming, creating an environment ripe for rust.
Safety First: Essential Precautions Before You Begin
Before you begin any rust removal project, prioritizing safety is non-negotiable. The methods described range from mild household solutions to potent chemicals, and proper precautions protect you and the surfaces you’re working on.
Personal Protective Equipment (PPE): Gloves, Eye Protection, Ventilation
Always wear chemical-resistant gloves (nitrile or rubber) to protect your skin from both acidic solutions and potential abrasives. Safety glasses or goggles are essential to shield your eyes from splashes. When working with stronger chemicals or in enclosed spaces, ensure adequate ventilation by opening windows and using a fan to disperse fumes.
Workspace Preparation: Protecting Surfaces and Ensuring Airflow
Protect adjacent materials like countertops, wood, stone, or paint from accidental spills or splatters. Lay down plastic sheeting or old towels to cover the surrounding area. A well-ventilated space is crucial not only for your health but also for helping moisture evaporate after cleaning.
Testing a Small, Inconspicuous Area
This is the golden rule of cleaning. Before applying any solution to a large, visible area, test it on a small, hidden spot first—such as the back of an appliance or the underside of a sink. Wait a few minutes, then wipe, rinse, and dry the area to check for any discoloration, etching, or damage to the finish.
Understanding Cleaning Solutions and Corrosive Chemicals
Be aware of the nature of the products you are using. Mild acids like vinegar and lemon juice can be effective but should not be left on the surface for extended periods. Stronger products containing oxalic acid or phosphoric acid are highly effective but can be corrosive and require strict adherence to manufacturer instructions and safety protocols. Never mix different cleaning chemicals, especially bleach and acids, as this can create toxic gas.
Preparation Steps: Setting the Stage for Successful Rust Removal
Proper preparation is half the battle. A clean, well-assessed surface allows your chosen cleaning method to work directly on the rust, leading to more effective and efficient results.
Initial Cleaning: Removing Loose Dirt, Grime, and Filth
Before addressing the rust itself, perform a general cleaning of the stainless steel surface. Use a soft cloth or sponge with warm water and a mild dish soap to wash away any loose dirt, grease, or grime. This ensures that your rust removal solution can make direct contact with the oxidation. Rinse thoroughly with clean water and dry completely with a microfiber cloth.
Identifying the Type and Severity of Rust
Examine the rust spots closely. Are they light, orange-colored stains that seem to be only on the surface? This is likely surface rust from external contamination. Or do you see darker, more textured spots, possibly with small indents? This could indicate pitting, a more advanced form of corrosion that requires a more aggressive approach. Matching the method to the severity is key to success.
Gentle & Natural Methods: Your First Line of Defense
Always begin with the mildest cleaning method appropriate for the rust stain. These household remedies are often surprisingly effective for light surface rust and are the safest options for you and your stainless steel appliances.
Baking Soda Paste: Mildly Abrasive and Effective for Surface Rust
Baking soda is an excellent starting point. Its fine particles act as a gentle abrasive that can lift rust stains without scratching the metal.
- Create a thick paste by mixing baking soda with a small amount of water.
- Apply the paste directly to the rust spots.
- Let it sit for 30-60 minutes.
- Gently scrub the area with a soft-bristled brush (like a toothbrush), always moving in the direction of the metal’s grain.
- Rinse thoroughly with warm water and dry completely.
White Vinegar Bath or Spray: Acetic Acid for Mild Stains
The acetic acid in white vinegar can dissolve light rust.
- For small items, you can submerge them in a bowl of white vinegar for a few hours.
- For larger surfaces, apply white vinegar using a spray bottle.
- Let the vinegar sit for 5-10 minutes, but do not let it dry on the surface.
- Scrub gently with a non-abrasive sponge, again following the grain.
- Rinse the area with water and dry immediately to prevent water spots.
Lemon Juice and Salt: A Natural Acidic and Abrasive Combo
This combination leverages the acidic properties of lemon juice and the gentle scouring power of salt.
- Sprinkle a layer of salt over the rust stain.
- Squeeze fresh lemon juice over the salt until it’s saturated.
- Allow the mixture to sit for 1-2 hours.
- Use the lemon rind to gently scrub the area. The rind is soft enough to avoid scratching the surface.
- Rinse and dry thoroughly.
Potato and Dish Soap or Baking Soda: Leveraging Oxalic Acid
Potatoes contain a small amount of oxalic acid, a compound effective at breaking down rust.
- Cut a potato in half.
- Dip the cut end in dish soap or baking soda.
- Rub the potato firmly on the rust spot in a circular motion. The combination of the acid and the mild abrasive will work on the stain.
- Rinse the surface with water and dry completely.
Aluminum Foil and Water: Gentle Mechanical Abrasion
A balled-up piece of aluminum foil dipped in water creates a gentle abrasive action. The chemical reaction between aluminum and rust also helps lift the stain. This is best for durable, non-decorative surfaces.
- Tear off a small piece of aluminum foil and crumple it into a ball.
- Dip the foil in water or white vinegar.
- Gently rub the rust spot.
- Wipe the area clean and dry.
Mild Chemical & Specialized Products: Stepping Up the Game
If natural methods don’t fully remove the rust, the next step is to use commercially available cleaners specifically designed for metal surfaces. Always follow the product’s directions precisely.
Bar Keepers Friend (Oxalic Acid-Based Cleaner)
Bar Keepers Friend is a popular and highly effective powdered cleaner. Its active ingredient is oxalic acid, which is excellent for dissolving rust.
- Wet the stainless steel surface.
- Sprinkle a small amount of the powder onto the rust.
- Create a paste using a damp sponge or cloth.
- Gently rub the paste in the direction of the grain for up to one minute.
- Rinse immediately and thoroughly.
- Dry the surface to a shine.
WD-40: Lubricant, Penetrant, and Mild Rust Remover
While primarily known as a lubricant, WD-40 can be effective on very light surface rust. It works by penetrating the rust and breaking its bond with the metal surface.
- Spray a small amount of WD-40 onto the rust spot.
- Let it sit for 5-10 minutes.
- Use a fine-grade abrasive, like a non-scratch scouring pad, to gently scrub the area.
- Wipe away the residue with a clean cloth, then clean the surface with soap and water to remove any oily film.
Commercial-Grade Stainless Steel Cleaners and Polishes
Many dedicated stainless steel cleaners contain chemicals that help dissolve rust and polishes that can help restore the protective layer. Look for products specifically labeled for rust removal and follow the instructions carefully, always testing in a hidden area first.
Addressing Stubborn Rust & Pitting: Advanced Methods with Extreme Caution
For severe rust that has started to pit the metal surface, more potent chemical solutions may be necessary. These methods should be considered a last resort and require extreme caution, including full PPE and excellent ventilation.
 If you're maintaining stainless steel items in your kitchen, browse our latest kitchen accessories:
De Studio Home
Citric Acid Powder Solution: A Stronger Organic Acid
Citric acid, sold in powdered form, is stronger than lemon juice and can be mixed into a powerful rust-removing solution.
- Mix a few tablespoons of citric acid powder with hot water in a spray bottle.
- Spray the solution onto the stubborn rust and let it sit for 10-20 minutes.
- Scrub with a soft brush, rinse thoroughly, and dry.
Oxalic Acid Solutions (Specific Rust Removers): For More Aggressive Rust
Dedicated rust removers often feature oxalic acid as their primary ingredient. These are much more concentrated than household cleaners and are very effective but must be handled with care. Read and follow all manufacturer warnings and directions for application, dwell time, and rinsing.
Phosphoric Acid-Based Rust Removers (Rust Converters): Use as a Last Resort
Products containing phosphoric acid not only remove rust but also convert it into a black, paintable phosphate coating. This is more common for restorative work on heavily rusted items and may alter the appearance of stainless steel. Use this type of product only if the aesthetic finish is not the primary concern and after consulting product specifications.
Conclusion
Successfully removing rust from stainless steel is a rewarding process that restores the beauty and longevity of your metal surfaces. The key takeaway is to approach the task methodically: start by understanding the cause, prioritize safety, and always begin with the gentlest cleaning method first. Light surface rust can often be conquered with simple household items like baking soda or white vinegar, while more persistent stains may require specialized cleaners containing oxalic acid.
For next steps, focus on prevention. After a thorough cleaning and rust removal, make regular maintenance a habit. Keep your stainless steel appliances and surfaces clean and dry, especially after exposure to moisture or corrosive substances. Avoid using abrasive tools like steel wool and be mindful of contact with other iron products. By combining proper rust removal techniques with diligent maintenance, you can ensure your stainless steel remains truly stainless for years to come.

Sebastian D’souza is a leading expert in home and kitchen appliances, dedicated to transforming everyday living with high-quality, stylish, and innovative solutions. As the founder of De Studio Home, our passion for design and functionality, sustainability drives us to curate the best products for modern homes. Our commitment to excellence ensures that every customer enjoys a perfect balance of practicality and elegance in their living spaces.